Whitelisting an email in Gmail means allowing messages from a specific sender to always land in your inbox. Gmail has built-in filters that sort incoming mail. If a sender isn’t on your whitelist, Gmail may place those messages in the spam folder or under categories like Promotions or Updates.
The whitelist tells Gmail, “I trust this sender. Don’t block or sort their messages out.” It’s a manual override to Gmail’s automatic sorting. You create it by marking emails as safe, adding addresses to contacts, or setting up custom rules in Gmail settings.
This simple but important step ensures you don’t miss important messages from coworkers, clients, or newsletters you signed up for. It helps avoid digging through folders trying to locate emails that should’ve been easy to find.
Why Whitelisting Matters for Email Communication
Email is still the most widely used tool for work, school, and personal communication. But spam filters are aggressive. They often flag or redirect legitimate messages. Even an email with clean content and a known sender can end up filtered due to Gmail’s safety-first model.
Whitelisting reduces these issues. It gives you control over your inbox. It’s especially useful for recurring messages—such as newsletters, invoices, or log-in alerts. Whitelisting is part of email hygiene—keeping your inbox clear, relevant, and accurate.
It’s not just for power users. Anyone who uses Gmail, even casually, can benefit from setting this up. By whitelisting trusted senders, you minimize the chances of misplacing or missing important information.
Common Reasons Emails Go to Spam Instead of Inbox
Gmail’s spam filters are automated. They scan every incoming message. The filters check for specific patterns or “signals” that look suspicious. These include unusual formatting, unexpected links, poor grammar, or known blacklisted servers. Gmail also uses user reports. When many people mark an email as spam, it becomes more likely that similar messages will get flagged.
This system protects users from scams and low-quality messages. But it’s not perfect. Sometimes, legitimate emails get caught in the net. These false positives are frustrating because they break communication.
Triggers That Lead to Misclassification
Even well-written, safe messages can land in spam for reasons like:
Subject Line Language
If the subject line uses aggressive marketing terms or too many symbols, it might be flagged. Phrases like “Get rich now” or “Click fast!” raise red flags. Capital letters and excessive punctuation are also issues.
Email Content and Attachments
Emails with attachments or lots of links might be flagged, especially if sent in bulk. If the content seems like a promotional offer or doesn’t match the subject line, Gmail might sort it out of the inbox.
Bulk Sending Patterns
When a sender emails hundreds or thousands of users at once, Gmail pays close attention. If some recipients mark it as spam, even others who signed up for it may find it blocked.
Understanding these triggers is important. You can avoid them, or at least spot them when Gmail misclassifies an email. If you’re the sender, make small changes to improve delivery. If you’re the receiver, whitelisting solves the problem.
Step-by-Step Guide to Whitelisting an Email in Gmail
Using the Gmail Web Interface
Here’s how to whitelist an email in Gmail using a regular browser:
- Open Gmail and log into your account.
- Click the gear icon at the top right and choose “See all settings.”
- Go to the “Filters and Blocked Addresses” tab.
- Click “Create a new filter.”
- In the “From” field, enter the email address or domain you want to whitelist.
- Click “Create filter.”
- Check the box for “Never send it to Spam.”
- Hit “Create filter” again to save.
This action tells Gmail to always deliver messages from that address or domain to your inbox.
Creating Filters for Known Senders
You can create filters for any sender—not just those who’ve been blocked before. Filters are like rules. They tell Gmail how to handle incoming mail. When setting a filter, you can also apply it to past messages.
To filter a known sender:
- Open an email from the person.
- Click the three-dot menu at the top right of the message.
- Choose “Filter messages like this.”
- Follow the same steps as above to whitelist.
Filters give you extra control. You can move emails to specific folders, apply labels, or mark them as important.
Marking Specific Emails as “Not Spam”
Sometimes Gmail places legitimate emails in spam. When that happens:
- Go to the Spam folder.
- Open the email.
- Click “Report not spam” at the top.
This moves the email to your inbox. Gmail remembers this action and learns that similar messages shouldn’t be blocked again.
You can learn more about this in our related guide: [Spam Folder — What It Is and How It Works].
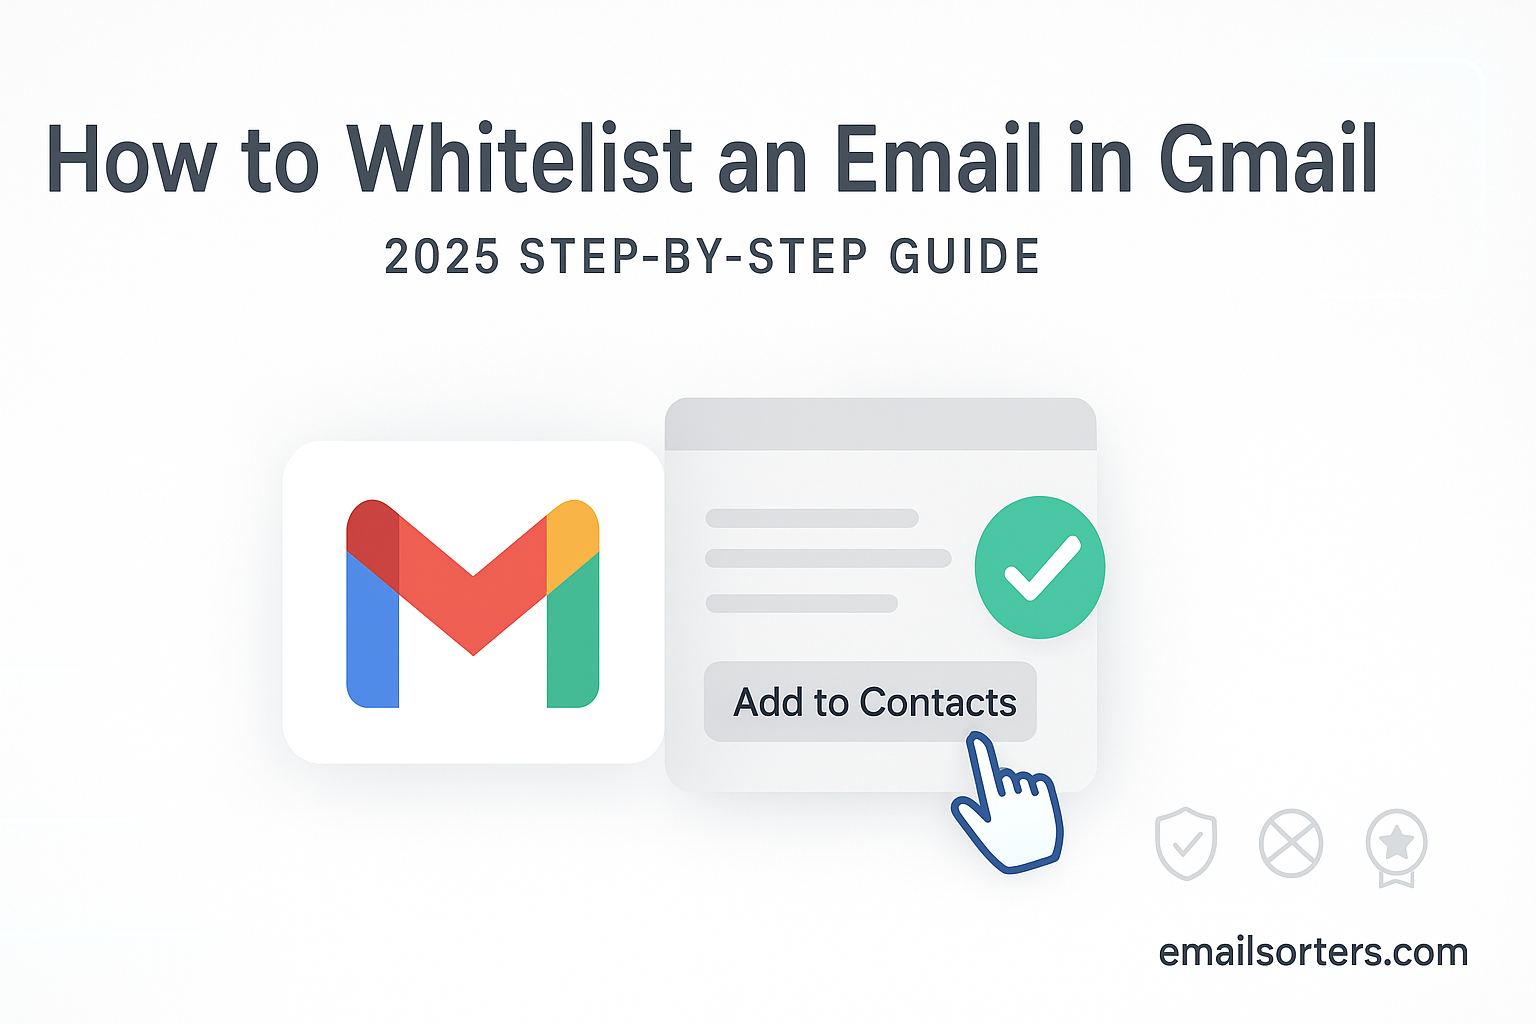
Adding Contacts to Gmail’s Address Book
Another simple method is adding the sender to your contacts:
- Open the email.
- Hover over the sender’s name.
- Click “Add to Contacts” in the popup box.
Emails from people in your contact list are less likely to be flagged as spam. This is the most basic form of whitelisting.
How to Whitelist an Email on Gmail Mobile App
Limitations of Mobile App Interface
Using the Gmail mobile app to whitelist an email isn’t as direct as doing it from the desktop interface. The app lacks full access to Gmail’s filter creation features. You won’t see options to create filters or set up advanced inbox rules. What you can do is mark emails as safe and move them out of spam manually. This tells Gmail to learn from your actions, but it isn’t as exact as filter setup on a computer.
While Gmail for Android and iOS lets users report spam or mark emails as not spam, it doesn’t offer the full “Filters and Blocked Addresses” tab. This limits your control, especially if you’re trying to whitelist a domain or set a rule for multiple senders. You’ll also find it harder to add exceptions or handle labels when using just the app.
Many users expect the mobile app to offer all the features found in the web version, but that’s not the case. The app focuses on convenience and basic inbox management. If you need granular control like whitelisting, Gmail recommends using the web version via a browser. This is because most configuration settings are not built into the app itself.
Recommended Workarounds
Even though filter creation isn’t available on mobile, there are workarounds. One is to use the “Not Spam” option. Open the Spam folder, find the email you want to whitelist, open it, and tap the three-dot icon. Select “Report not spam.” This helps Gmail learn that future messages from this sender shouldn’t be filtered.
Another workaround is to add the sender to your contacts through the mobile version of Gmail’s website using a browser like Chrome. By switching to desktop view on your mobile browser, you can access settings that aren’t present in the app.
These steps aren’t as precise as filter creation, but they can reduce the chances of losing emails in the spam folder. If you manage important communications and rely on a mobile device, it’s best to occasionally check your filters on a desktop browser for more control.
Managing Gmail Filters for Better Inbox Control
Understanding Custom Filters
Gmail filters are rules that automatically sort incoming messages. They can help prevent important emails from being buried under less urgent ones. Filters give you the ability to label, archive, delete, star, or forward specific emails based on conditions you set. When used for whitelisting, these filters prevent trusted emails from being marked as spam.
To manage filters, log in to Gmail on a desktop browser. Go to “Settings” and then “Filters and Blocked Addresses.” From here, you can create, edit, or delete filters based on sender, subject, or keywords. Custom filters allow precision that isn’t possible with Gmail’s automatic system. They help ensure that messages from important senders are handled exactly the way you want.
For instance, if you receive invoices from a certain address every month, you can create a filter to send them directly to a specific label and mark them as important. This saves time and avoids missing deadlines due to misplaced emails.
Editing or Removing Old Filters
Over time, filters may become outdated. You might stop communicating with a sender, or the filter conditions may no longer apply. Regularly reviewing your filters ensures they stay relevant and helpful. You can go to the same “Filters and Blocked Addresses” tab in Gmail settings and check the list of current filters. Each one will have an option to edit or delete.
Editing a filter lets you change the email address, subject, or actions taken. Deleting a filter removes it entirely. This kind of maintenance keeps your inbox running smoothly and ensures that old rules don’t interfere with your current email habits.
It’s also a way to clean up if you’ve whitelisted senders who are no longer trusted. Remove their filters to prevent future spam or phishing risks.
Preventing Future Issues with Smart Filtering
Creating smart filters is more than just whitelisting. It’s about organizing and protecting your inbox. You can set filters to automatically categorize emails, highlight important ones, and separate newsletters from personal messages. If Gmail flags a trusted sender by mistake, you can use filters to fix that.
For example, if a sender’s email keeps getting sent to Promotions, even after whitelisting, you can create a filter to force it into your Primary tab. This way, Gmail’s default sorting doesn’t override your preference.
Smart filtering isn’t about complexity—it’s about using Gmail’s built-in tools to stay in control. It keeps your inbox clean and makes it easier to find what matters. That’s especially helpful if you rely on email for business, school, or frequent communication.
Difference Between Whitelisting and Blocking in Gmail
Blocking Unwanted Emails
While whitelisting allows messages from trusted senders, blocking does the opposite. It prevents emails from specific senders from reaching your inbox. Gmail provides a simple way to block senders, which is useful when you receive spam, promotional messages, or anything you don’t want to see again.
To block someone in Gmail, open an email from that sender. Click the three-dot menu in the top right corner and select “Block [Sender Name].” After that, Gmail will automatically move future messages from that address to the Spam folder. You won’t see those emails in your inbox unless you manually check the Spam folder.
This feature helps keep unwanted content out of your inbox. It’s effective for repeat offenders or messages that aren’t filtered automatically. Blocking is permanent until reversed, so use it only when you’re sure you no longer want to receive emails from that sender.
For a full walkthrough, visit [Block Senders — How to Block Email Senders: Step-by-Step Guide (2025)].
When to Block vs. When to Whitelist
Deciding whether to block or whitelist depends on the purpose of the sender. Whitelist someone if you expect messages from them regularly, like a newsletter, school updates, or client emails. Block someone if they send spam, irrelevant marketing, or messages you never signed up for.
Whitelisting improves deliverability and visibility of important emails. Blocking protects you from spam and helps keep your inbox clear. They are opposite tools with the same goal—controlling what reaches your inbox.
It’s also important to note that you can do both at once. For example, you can whitelist known addresses while blocking domains that frequently send spam. Gmail allows flexibility in how you manage incoming emails, letting you build a system that fits your needs.
Gmail Categories and Tabs: A Hidden Obstacle
Promotions and Social Tabs Explained
Gmail uses tabs like Primary, Promotions, Social, Updates, and Forums to sort messages automatically. This system helps users see what matters most right away. However, it can be frustrating when important emails land in the wrong tab. You might whitelist a sender and still not find their message in Primary, simply because Gmail placed it under Promotions or Social.
Promotions include newsletters, offers, and ads. Social holds notifications from social media platforms. Even if you trust a sender, Gmail may label their content based on keywords or layout, causing it to land in these tabs.
This sorting isn’t perfect. Gmail bases it on internal algorithms that guess what type of content the email contains. But if you’re expecting something urgent or important, being placed in the wrong tab can cause delays or missed responses.
Moving Whitelisted Emails to Primary Tab
To make sure whitelisted emails show up in your Primary tab, you can train Gmail manually. Open the message, drag it from Promotions or Social and drop it into Primary. A popup will ask if Gmail should always place future emails from that sender in Primary. Confirm it.
This trains Gmail’s sorting logic based on your action. It also increases the chance that similar messages from the sender will stay in the correct tab.
Repeat this step for each sender you trust. Over time, Gmail gets better at sorting based on your preferences. This is especially helpful for managing newsletters, subscriptions, and automated messages that often default to Promotions.
How to Prevent Gmail from Automatically Flagging Trusted Emails
Reduce False Positives Using Filters
When Gmail flags a legitimate email as spam, it’s called a false positive. These mistakes happen more often than expected. A strong way to prevent them is by creating specific filters. These filters tell Gmail how to treat emails from trusted senders. Instead of relying on Gmail’s built-in detection, the system follows your custom instructions.
Set filters for known senders or domains that have previously been flagged. Include the sender’s full email or domain, then choose the option “Never send it to Spam.” This ensures messages always go straight to your inbox. You can also use keywords in the subject or message body to fine-tune the rule. It’s a straightforward fix that puts you in control.
This is particularly useful if you frequently deal with automated emails—such as invoices, reports, or alerts. Gmail may misinterpret these as spam due to formatting or bulk delivery. Filters correct this issue without changing the content of the email itself.
Prevent Common Spam Flags
Gmail flags certain behaviors or elements that suggest spam. These include misleading subject lines, too many links, or unverified sender identities. If you want to ensure emails from specific senders don’t trigger those flags, teach them best practices.
For example, the sender should avoid all-caps subject lines, strange formatting, and suspicious file types. If they use email marketing software, make sure they follow authentication rules like SPF and DKIM. These help Gmail recognize the sender as legitimate.
If you’re the recipient, the best thing you can do is mark safe emails as “Not Spam” and add them to your contacts. Doing both boosts Gmail’s confidence in the sender and reduces future errors. Gmail adapts its filtering over time, so your corrections help refine its judgment.
Using Gmail’s Contact List as a Whitelisting Tool
Benefits of Adding Contacts Manually
Adding someone to your contact list is one of the simplest ways to whitelist them. Gmail is less likely to flag or misroute messages from saved contacts. This works especially well for personal or work-related emails.
To add a contact, open an email from that sender. Hover over their name and click “Add to Contacts.” Gmail updates your address book, and the system begins treating emails from that sender as safe. It’s a subtle action with strong results.
Unlike filters, contacts don’t come with rules. They simply act as a trust signal. If Gmail sees that you’ve saved someone, it assumes you want their emails delivered. While not foolproof, this tactic is part of a complete whitelist strategy.
Ensuring Email Delivery From Known Addresses
After adding someone to your contacts, it’s still smart to check if their emails are arriving as expected. If you notice delays or misplacements, combine contact saving with filters. Create a filter for that sender and mark their messages to skip spam. This double coverage adds a safety layer.
You can also organize contacts into groups. For example, group all work-related senders into one list. While Gmail doesn’t use these groups for filtering, it helps with your own organization. You’ll be able to track senders better and adjust your filters faster.
If you change email habits often—such as subscribing to new services or switching roles—it’s good to review your contact list every few months. Remove senders you no longer communicate with and focus on those you want to keep whitelisted.
How Gmail Spam Folder Works and How It Affects Whitelisting
The Spam folder is Gmail’s quarantine zone. Emails that match certain triggers are automatically moved here without hitting your inbox. It’s meant to protect users from scams, malware, and junk mail. But it can also hide messages you actually want to see.
Every message in the Spam folder stays for 30 days unless you take action. After that, Gmail deletes them permanently. This can lead to missed opportunities or communication gaps if you forget to check the folder.
You can go to the Spam folder, open a message, and click “Report not spam.” This moves it back to your inbox and teaches Gmail to treat future messages from that sender differently. Over time, Gmail improves based on what you mark as not spam.
This feedback loop is essential. It’s how Gmail learns your preferences. If you consistently pull the same sender out of spam, Gmail will eventually stop flagging them.
What Happens to Emails Marked as Spam
When Gmail places a message in the Spam folder, several things happen. First, the message doesn’t trigger any of your inbox filters or labels. You won’t get a notification, and the email won’t appear in your regular search results unless you include Spam in your search scope.
Spam messages are also scanned more closely for viruses or malicious links. Gmail often disables links and attachments in spam emails, which means you won’t be able to click or download until the email is marked as safe.
Whitelisted senders are much less likely to go through this process. That’s why creating filters and adding contacts matters. It tells Gmail these messages don’t belong in spam, so the system won’t apply those restrictions.
Advanced Whitelisting: Domain Whitelisting in Gmail
Whitelisting All Emails From a Domain
Whitelisting a full domain allows every email from a company or organization to bypass spam filters. This is useful if you work with a business that sends emails from many different addresses under the same domain. For example, all messages from “@companyname.com” can be treated as safe.
To do this, create a new filter in Gmail’s settings. In the “From” field, enter the domain like @companyname.com. Then check “Never send it to Spam.” You can also assign labels or star the messages if needed.
This saves time. Instead of creating separate filters for each new sender under the same domain, one rule covers all. It’s efficient for teams, newsletters, or educational platforms that use multiple email addresses.
Be careful not to whitelist domains that send spam. Once approved, every address under that domain will be delivered to your inbox—even if it’s unsolicited.
When Domain-Level Filtering Is Useful
This method works best when you trust the source fully. Examples include workplace domains, official school emails, or partner companies. It also applies to tools like CRMs, where automated messages come from many different senders under one domain.
If you frequently see messages from a specific company get flagged, a domain-level filter solves the problem. It ensures all communication from that domain is treated the same way.
It’s also a time-saving option. Instead of responding to each flagged email manually, domain filters fix the issue at the root. You can avoid duplicate work and keep your inbox clean.
Email Filtering Techniques for Power Users
Email filters allow users to manage their inbox like a customized control panel. You can sort messages based on sender, subject, content, or even size. Power users take advantage of Gmail’s full range of filter options to keep their inbox running smoothly.
A typical filter might tag all invoices with a label or archive newsletter emails after one day. You can use filters to separate business and personal messages, send urgent emails to your phone, or highlight updates from key clients.
Whitelisting through filters fits right into this system. You combine rules for trust, urgency, and relevance to shape a better email experience. It takes time to set up but saves time every day.
Use Cases Beyond Whitelisting
Beyond spam control, filters are useful for scheduling, organization, and prioritization. You can label travel confirmations, forward certain messages to your assistant, or send specific updates to a team folder. Filters let Gmail act automatically, without needing constant oversight.
Filters help you deal with volume. If you get hundreds of messages a day, manual sorting becomes impossible. Filters solve that problem. Combine them with whitelisting to avoid missing anything that matters.
Comparison: Gmail vs Outlook Whitelisting Options
Pros and Cons of Gmail’s Filter Tools
Gmail gives users detailed control over how emails are sorted, labeled, and delivered. Filters in Gmail are versatile. You can specify the sender, subject, words in the email, and other attributes. Once these conditions are met, Gmail performs a set action, such as skipping the inbox, marking as important, or never sending it to spam.
One advantage is that Gmail filters are easy to create from any email. You don’t need technical knowledge. Even someone unfamiliar with settings can follow a few steps and set filters that work. Filters can also apply to past messages, allowing bulk management.
However, Gmail’s filters also have limitations. For one, filters created on the web version don’t sync fully with the mobile app. Also, Gmail doesn’t let you whitelist based on attachment type or other advanced metadata. This means certain complex sorting needs may not be addressed unless paired with third-party tools.
Gmail users also rely heavily on the spam detection system. Even with filters, Gmail might override actions if it strongly suspects an email is dangerous. This is a safety measure, but it can occasionally interfere with whitelisting. That’s why combining filters, contacts, and manual training gives the best results.
Stay Productive
In comparison, Outlook uses its own system called Focused Inbox. This tool separates high-priority messages from general emails. Microsoft’s logic decides what’s “focused,” and users can manually train it by moving messages between tabs.
Outlook offers similar filtering capabilities through Rules. These rules allow users to sort, flag, or delete emails based on custom conditions. Whitelisting in Outlook often involves marking messages as “Not Junk” or adding senders to the Safe Senders List.
One advantage Outlook has is better integration between desktop, mobile, and web apps. Filters (or rules) created in one place work across all devices. Gmail still lags behind in mobile support for filter management.
Each platform offers strengths. Gmail focuses on simplicity and smart sorting, while Outlook provides more structured control and better sync across devices. Choosing between them depends on your specific needs.
What to Do If Whitelisted Emails Still Don’t Show Up
Checking All Mail, Spam, Trash
If you’ve created filters and added contacts but still don’t see certain emails, start by searching “AOL Mail.” This is Gmail’s catch-all folder that includes every email, regardless of label or inbox tab. Sometimes, emails are archived or labeled in ways that make them skip the inbox. They’re not deleted—they’re just moved.
Search for the sender’s email or domain in All Mail. If found, check its status. If it has no “Inbox” label, it means a filter might be archiving it. Review your filters to confirm whether any rule is unintentionally hiding the message.
Also, check the Spam folder again. Even whitelisted senders can be flagged if Gmail strongly suspects phishing. Open the email and mark it as “Not Spam.” This resets Gmail’s assumption and starts building trust again.
Trash is another place to look. A filter could be deleting the message, or you may have deleted it accidentally. Emails in Trash are auto-deleted after 30 days, so act quickly if you suspect a mistake.
Contacting Gmail Support
If you’ve checked all folders and verified filters but emails still disappear or go missing, you can contact Gmail support. For personal Gmail accounts, support options are limited. You may be redirected to community forums or help articles.
For business users with Google Workspace accounts, support is better. Admins can access live chat or email support to report mail delivery issues. They can also access logs that show whether Gmail received and processed the message.
Before contacting support, gather details. This includes the sender’s full email address, message subject, approximate time sent, and any related filters. This helps Google investigate faster and provide more accurate help.
If Gmail didn’t receive the message at all, the issue may be on the sender’s end. You can ask them to resend the email or verify if it bounced back. Either way, communication helps solve the problem faster.
Safety Tips While Whitelisting Emails
Avoiding Phishing or Scam Emails
Whitelisting is powerful, but it comes with risks. Once a sender is whitelisted, their emails are delivered without much review. That’s why you should only whitelist addresses you trust completely. Scam emails often appear safe—using names or formats that look familiar. If you whitelist such an address, you may miss warning signs later.
Before adding someone to your whitelist, double-check their email domain. Watch for small misspellings like “gmai1.com” instead of “gmail.com.” Scammers use these tricks to bypass spam filters and appear legitimate.
If an email asks for passwords, bank details, or contains urgent threats, don’t whitelist it. Gmail flags these emails for a reason. Even if the sender appears familiar, confirm with a call or a different message.
For added safety, don’t whitelist emails with attachments unless you fully trust the sender. If you receive strange files or requests you didn’t expect, pause and investigate before adding the sender to your filters or contacts.
Checking Sender Authenticity
To confirm if a sender is genuine, check the full “From” address—not just the display name. Click the three-dot menu next to the message, then choose “Show original.” Gmail shows authentication info like SPF, DKIM, and DMARC.
If the message fails these checks, it may be spoofed or coming from an unsafe server. Even if the content looks fine, failed verification means the email can’t be trusted fully.
It’s also smart to run new sender emails through external tools like Google Safe Browsing or email validation checkers. These tools help detect known scams and blacklisted domains.
Whitelisting works best when combined with caution. Think of it like giving someone a key to your inbox. Only hand that key to people you’ve verified and trust.
Summary and Final Thoughts
Whitelisting in Gmail is a smart way to take control of your inbox. Whether you’re trying to keep important emails from going to spam, organize messages from trusted senders, or prevent missed communication, using filters, contacts, and manual actions helps build a cleaner, more reliable inbox.
The steps may seem technical at first, but they follow a logical flow. From setting filters to adding contacts, every action teaches Gmail how to handle your mail better. You can also explore more advanced tactics like domain whitelisting or using third-party tools for deeper control.
Avoiding mistakes like over-whitelisting unknown senders or ignoring Gmail’s security signals is key. Keep a balance—use whitelisting for trusted sources and rely on Gmail’s built-in protections for the rest.
Remember to review filters, check spam regularly, and keep your contact list updated. These habits improve Gmail’s performance and protect your communication channels.
FAQs
How many emails can I whitelist in Gmail?
There’s no strict limit on how many senders you can whitelist using filters or contacts. However, Gmail may limit complex filter combinations for performance reasons. Keep your filters simple and focused on priority senders.
Can I whitelist an entire domain?
Yes. Create a filter with the domain in the “From” field using the format @example.com. Choose “Never send it to Spam” to whitelist all emails from that domain.
Why are my whitelisted emails still going to spam?
This happens if Gmail’s system detects a high threat level or if the email fails authentication checks. You can mark them as “Not Spam,” check your filters, and verify the sender is legitimate.
Is Gmail’s filtering the same on mobile and desktop?
No. Gmail’s mobile app does not support filter creation or management. You can mark messages as not spam or move them between tabs, but detailed control requires a desktop browser.
What is the best way to manage whitelist entries in Gmail?
Use a mix of filters and contact entries. Filters give specific control, while contact entries help Gmail identify trusted senders. Check and update both regularly to ensure smooth email delivery.