Swipe to delete email on iPhone is one of those small features that makes a huge difference. For many users, email feels less like a productivity tool and more like a source of stress. Messages pile up, spam mixes with important updates, and deleting emails one by one becomes a daily chore.
The default method, opening or holding each email before deleting, takes too much time. Multiply that by dozens of messages a day, and it’s easy to feel buried in digital clutter. If you’re checking mail on the go, while commuting, or in between tasks, it’s even more frustrating.
That’s where Swipe to Delete comes in. With one quick gesture, you can remove emails instantly without even opening them. It’s fast, efficient, and built right into the iPhone Mail app. Surprisingly, many people use iPhones for years without realizing this feature exists, or how customizable it is.
In this guide, you’ll learn how to enable Swipe to Delete, how to use it in your daily routine, and how to adjust the settings to fit your email habits. We’ll also cover quick fixes if it doesn’t work and show you how to combine swipe gestures with smarter inbox habits for a cleaner, stress-free email experience.
Why Use Swipe to Delete on iPhone
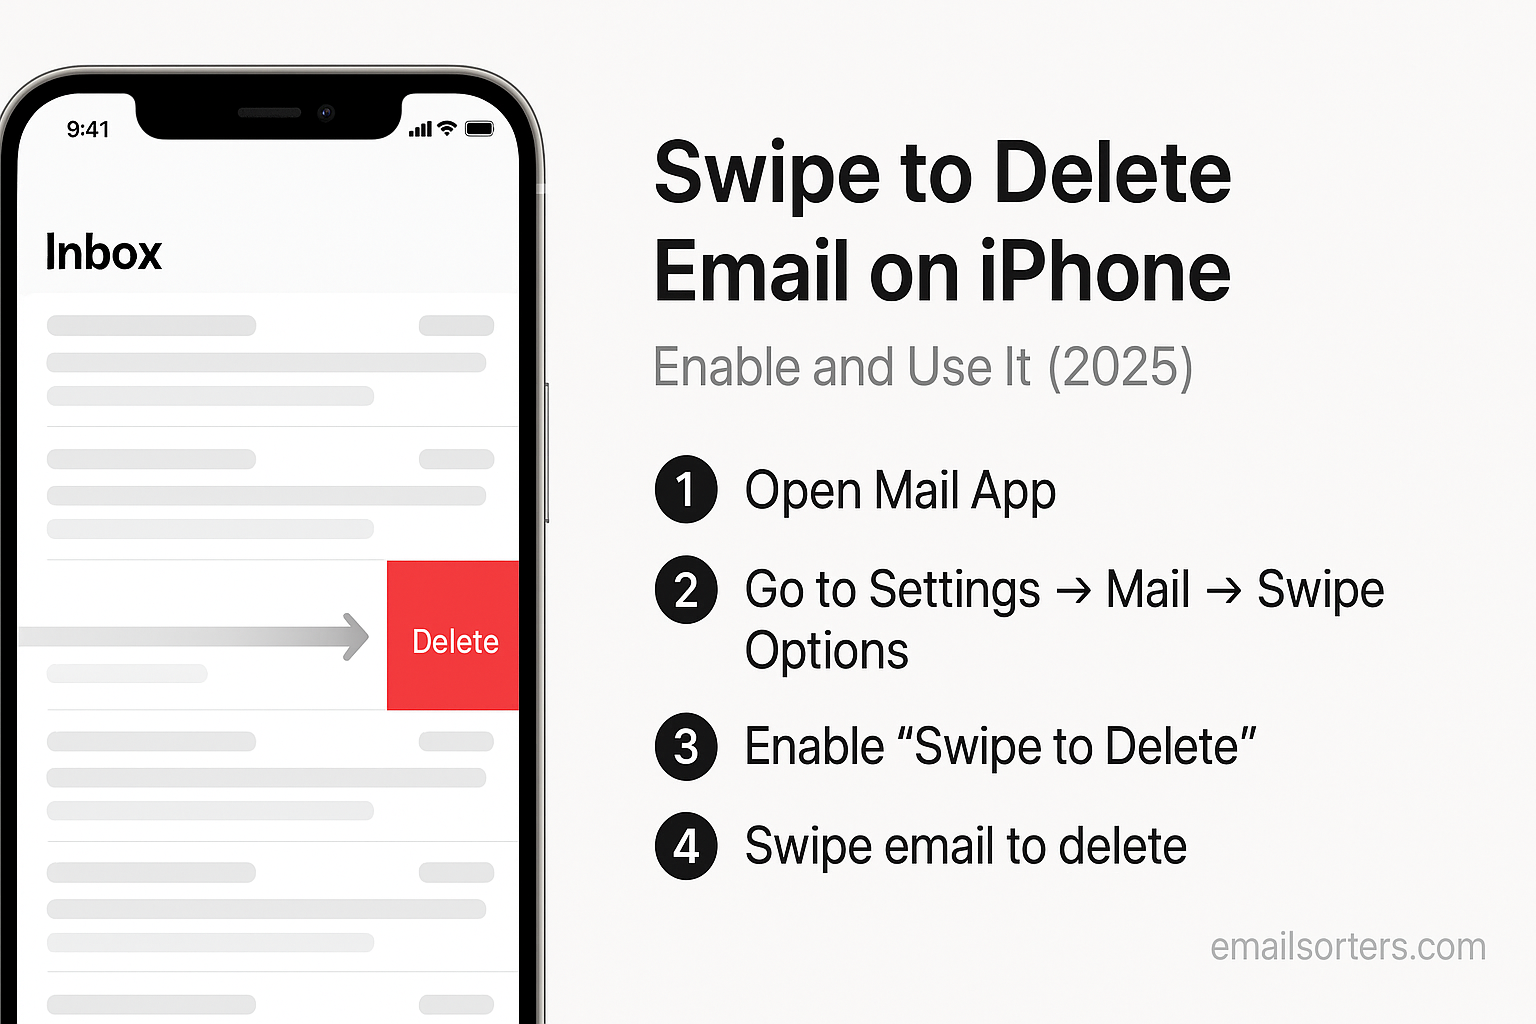
The swipe gesture works because it’s fast. There’s no tapping, holding, or dragging. Just swipe left on an email, tap “Delete,” and you’re done. This may sound simple, but when used regularly, it can transform your inbox routine.
Instead of treating email like a never-ending to-do list, you’ll start handling it like a pro. The iPhone’s Mail app supports smooth swiping actions that make it easy to manage hundreds of emails quickly. This helps reduce digital clutter and gives you more control over what stays in your inbox and what doesn’t.
For people who check email multiple times a day, Swipe to Delete saves a surprising amount of time. It’s ideal for clearing out spam, promotional messages, outdated notifications, or any other mail you no longer need. If you spend even five minutes a day cleaning up your inbox, this feature can cut that time in half.
Swipe gestures also pair well with other iPhone Mail features. You can swipe to archive, flag important messages, or mark them as read; all without opening a single email. That means you’re processing emails faster and more intentionally. No more endless scrolling through unimportant messages.
It also keeps your inbox focused. You can remove noise quickly and focus on what matters; whether it’s client emails, appointment reminders, or updates from your team. The faster you clear distractions, the more energy you have for what really counts.
Using gestures makes your phone feel smarter. Your fingers learn the motion, and soon, it becomes automatic; like flipping a light switch. The more you use it, the more you wonder how you ever lived without it.
How to Enable Swipe to Delete
Before using Swipe to Delete, you’ll need to make sure it’s enabled in your iPhone’s Mail settings. For most users, it’s turned on by default; but depending on your email account type or iOS version, the swipe might be set to “Archive” instead of “Delete.”
Here’s how to set it up the right way:
First, go to the Settings app on your iPhone. Scroll down and tap Mail. Then, tap Accounts. Select the email account you want to adjust, then tap Account > Advanced.
Now, under “Move Discarded Messages Into,” choose Deleted Mailbox instead of Archive Mailbox. This ensures that when you swipe on a message, it gets deleted rather than archived. Tap Done to save the changes.
That’s it. Now your swipe gesture will delete emails instead of moving them to archive.
On newer versions of iOS, the swipe settings might be under Settings > Mail > Swipe Options. In that case, you’ll see two options: Swipe Left and Swipe Right. Tap on Swipe Left and choose Delete as your preferred action. You can also change the right swipe to something useful, like “Flag” or “Mark as Read.”
If your Mail app doesn’t show your email account, or you haven’t added one yet, you won’t see the full options until setup is complete. In that case, follow this guide, how to add an email account to iPhone. It walks you through getting your account connected so you can start managing mail with gestures.
Keep in mind that some accounts, like Gmail or Outlook, may default to archiving instead of deleting. That’s why changing the swipe action in settings is so important. It puts you in control of what happens when you swipe.
Once this setup is done, you’re ready to start swiping your inbox clean.
Using Swipe to Delete in Daily Email Management
Managing email doesn’t have to be hard. Swipe to Delete turns cleanup into a fast, one-handed task. Here’s how to use it:
- Open the Mail app on your iPhone.
- Find an email you want to delete. Don’t tap it. Just look at the list view.
- Swipe left across the message. You’ll see a red Delete button appear.
- Tap “Delete” to remove the email immediately. It goes straight to the trash.
- If you see an Archive option instead, revisit your settings to enable delete mode.
There are a few other gestures to know:
- Swipe all the way left (a full swipe) to instantly delete the email without tapping.
- Swipe right can be customized to flag, mark as read, or move the message. It’s perfect for saving messages you want to follow up on later.
- Use this feature while waiting in line, riding the bus, or standing at the elevator. One swipe, one decision, and your inbox gets cleaner with every tap.
You can also combine gestures for powerful inbox control. For example, you might:
- Swipe left to delete spam
- Swipe right to flag an important message
- Open key emails and use the “Move” tool to file them into a project folder
Using swipes every day keeps your inbox from piling up. You’re not just checking mail; you’re processing it. That shift saves time and makes you feel more in control of your digital life.
Customizing Swipe Actions
Not everyone manages email the same way. Some people like to delete messages quickly, while others prefer to archive them for future reference. That’s why the iPhone gives you options to customize what each swipe does in the Mail app.
To change swipe actions, go to your Settings app. Tap Mail, then scroll down and choose Swipe Options. You’ll see two settings: Swipe Left and Swipe Right. Each one has different functions you can assign.
For the left swipe, you can choose actions like:
- Delete
- Flag
- Move Message
- Mark as Read
- None
For the right swipe, you have similar choices.
If you often need to save messages, you might set “Swipe Right” to Flag, so you can mark emails for follow-up. If you want to sort emails into folders, use Move Message. This is helpful for managing emails by client, project, or topic.
These customizations help fit the gestures to your habits. For example, if you don’t want to accidentally delete messages, set delete to the right swipe instead. Or if you like to archive most emails and only delete a few, adjust accordingly.
There’s no perfect setup. It depends on how you use your inbox. The good news is you can change these settings anytime. Try one setup for a week. If it doesn’t feel right, try another.
Custom swipe settings make email management on iPhone more personal. They allow you to choose what’s fast, what’s safe, and what’s useful. With just a few taps in Settings, your Mail app becomes a better match for how you work.
Troubleshooting When Swipe to Delete Doesn’t Work
Sometimes the Swipe to Delete gesture doesn’t behave the way you expect. If it’s not working, there are a few common reasons; and simple fixes to get things back on track.
First, check your swipe settings. Go to Settings > Mail > Swipe Options and confirm that the left swipe is set to Delete. If it says Archive, that’s likely why the red delete button isn’t showing.
Next, check your email account settings. For some services like Gmail or Yahoo, the Mail app might default to archiving instead of deleting. You’ll need to go to Settings > Mail > Accounts, select your email account, tap Account > Advanced, and set discarded messages to go to the Deleted Mailbox.
Another common issue is outdated iOS. If your device is running an older system, some gestures may not respond as expected. Go to Settings > General > Software Update to check for available updates. Installing the latest version can solve small bugs.
If you’ve recently changed accounts or deleted one, the Mail app may still be syncing in the background. This can slow things down or cause gesture errors. Give the app a moment, then force-close and reopen it.
Draft emails or unsent messages can also interfere with gesture behavior. These drafts sometimes prevent normal inbox cleanup, especially if they’re stuck in “Outbox” or saved without a subject. To fix this, review your drafts by tapping the compose button, then selecting “Drafts.” If you’re unsure how, unsent emails on iPhone to learn how to find and manage them.
With these small fixes, Swipe to Delete should be back in action; helping you stay focused and in control of your inbox.
Maximizing Productivity with Email Gestures
Swipe gestures are powerful on their own, but they really shine when paired with smart email habits. When used consistently, they can change how you interact with your inbox; and how much time you spend there.
Start by building a routine. Set aside time once or twice a day to check and manage email. During those sessions, use Swipe to Delete to clean out junk quickly. Use your custom right swipe to flag or mark the messages that need follow-up.
Avoid letting messages sit unread or half-read. The longer you delay, the more clutter builds up. With swipes, you can make decisions fast; keep, delete, file, or flag.
If you want fewer interruptions during your day, reduce how often your phone buzzes for new mail. Constant notifications hurt your focus and encourage you to check email too often.
Combining gestures with habits like these makes your inbox feel less like a burden and more like a tool. You’ll process emails faster, miss fewer replies, and save time for more important tasks.
Gestures also keep your thumb busy, not your brain. You won’t need to think about what to do next; your fingers will do the work.
It’s not just about speed. It’s about clarity. Every swipe moves you closer to an inbox that supports your goals, instead of dragging you down.
Conclusion
Inbox overload is a common struggle. But it doesn’t have to be your normal. Swipe to Delete is a simple, built-in feature on your iPhone that helps you clear clutter fast and take control of your email.
By enabling and customizing this gesture, you save time and reduce digital noise. You’ll clean up messages with one motion, respond faster, and focus better on what matters. You’ll also spend less time scrolling; and more time doing real work.
Whether you delete spam, flag reminders, or file emails by project, the swipe gesture makes everything faster. It works quietly in the background, but it has a big effect on how productive you feel.
Try it today. Tweak the settings. Test a new swipe routine. See how quickly your inbox transforms. And if something doesn’t work, don’t worry; there’s always a fix or a better gesture waiting for you.


