Gmail HTML signature setup lets you transform a plain sign-off into a branded, professional finish. Instead of just typing your name and title, you can add styled text, clickable links, images, logos, and even social icons. The result? Every email you send reinforces your brand and makes it easier for people to connect with you.
The trick is that Gmail’s built-in editor is limited. To create a polished HTML signature, you’ll need to use simple code, inline styles, and hosted images. Done right, it will display consistently across desktop, web, and mobile, without breaking formatting.
In this guide, I’ll walk you through how to set up an HTML signature in Gmail, share example code you can copy and paste, and give you styling tips to make it look sharp. By the end, you’ll have a signature that’s clean, professional, and ready to use every time you hit “Send.”
What Is a Gmail HTML Signature?
A Gmail HTML signature is a customizable block of text and graphics placed at the bottom of your outgoing emails. Unlike plain text signatures, an HTML signature uses HyperText Markup Language (HTML), the same code behind websites, to add design and interactivity.
This means your signature can include:
- Formatted text (bold, italic, colored fonts)
- Logos and headshots for personal or brand recognition
- Clickable links to websites, portfolios, or calendars
- Social media icons that direct recipients to your profiles
- Custom layouts that look polished and professional
Instead of a simple sign-off, an HTML signature works like a mini digital business card, combining branding with convenience.
Why It’s Still Relevant in 2025
Despite the rise of chat apps, video calls, and collaboration platforms, email remains the backbone of professional communication in 2025. From client outreach and job applications to customer support and business deals, email is still the universal standard.
That’s why your Gmail HTML signature continues to matter:
It extends your reach, as your signature travels with forwarded emails.
It reinforces your brand with every email you send.
It builds credibility, showing professionalism and attention to detail.
It saves time, since recipients instantly see your contact info and links.
Why HTML Beats Plain Text for Gmail Signatures
Consistent Branding Across Emails
Using HTML in your Gmail signature ensures your branding stays consistent. You can apply brand fonts, colors, and logos across every email. This is especially valuable for business accounts that aim to build brand recognition and trust.
Let’s say you work in marketing or design—receiving a plain, generic-looking email from you could raise questions about your attention to detail. A clean, branded HTML signature can reinforce professionalism and help make a strong, visual first impression.
Custom Styling and Formatting Options
HTML signatures allow you to control layout, font sizes, colors, and image placement with precision. Want your name in bold, your title in italics, and your company name in a larger font? HTML can do that. You can even arrange content into sections using tables or divs, add subtle lines or color blocks, and create spacing that guides the reader’s eye.
This level of control simply isn’t possible with Gmail’s basic text formatting options.
Clickable Links and Icons for Better Engagement
Clickable email signatures are convenient. They let recipients visit your website, social media profiles, schedule a meeting, or download a portfolio with just one click. HTML makes it easy to include:
- Linked logos and website URLs
- Social media buttons (LinkedIn, Twitter, etc.)
- Click-to-call or click-to-email links
These interactive elements help drive traffic and improve response rates.
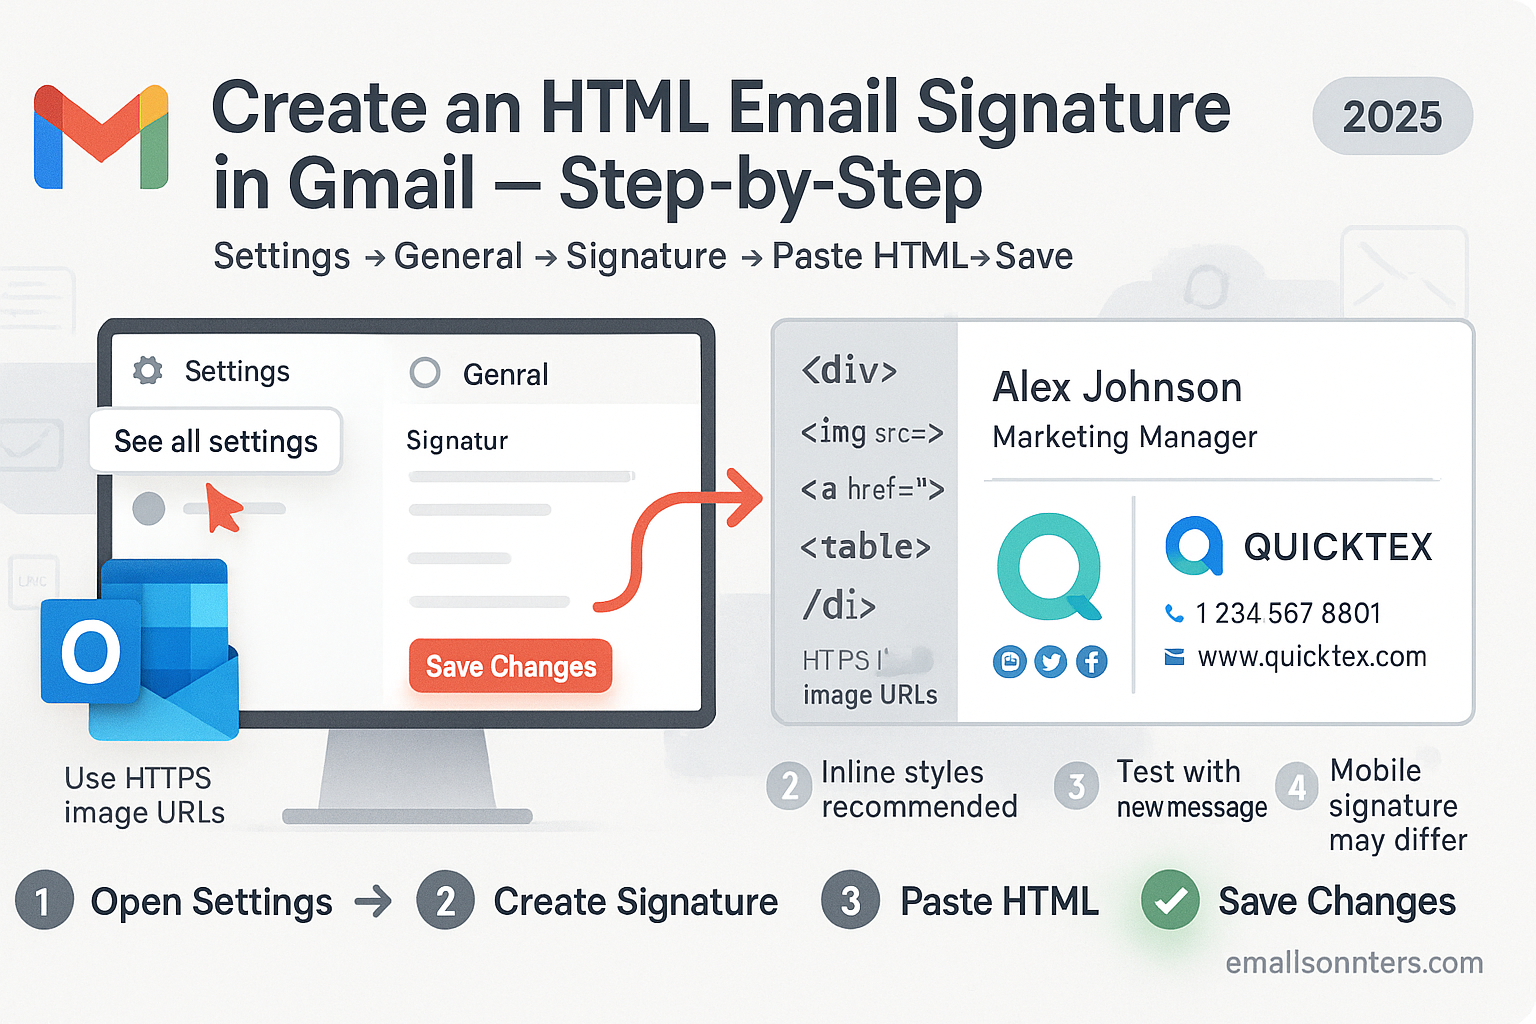
Where to Find Signature Settings in Gmail
How to Access Gmail Signature Settings on Desktop
To set or edit your Gmail HTML signature, you’ll need to use the web version of Gmail on a desktop or laptop. Here’s how to find the settings:
- Log in to your Gmail account.
- Click the gear icon (top right corner).
- Select “See all settings.”
- Scroll down to the “Signature” section under the “General” tab.
This is where you can create, edit, and assign email signatures for new messages and replies.
Mobile App Limitations for Signature Editing
Gmail’s mobile app does not support HTML signature formatting. On mobile, you can only set up a plain text mobile signature under Settings > Signature. Any HTML formatting will be stripped. That means:
- No clickable links
- No logos or styled text
- No branded formatting
If consistent branding matters across all devices, use the desktop version to set your HTML signature and keep your mobile signature minimal.
Syncing Across Devices
Once you set an HTML signature in Gmail’s desktop version, it applies automatically to messages sent from desktop or browser-based Gmail. However, it won’t show up when sending messages from the mobile app unless you manually copy it or use a third-party mail client that supports HTML.
For best results, always test your signature across devices (more on that later).
How to Create Your HTML Signature
Build One in a Simple HTML Editor (Like Notepad or CodePen)
If you’re familiar with basic HTML, you can build your own signature using a simple text editor like Notepad or an online tool like CodePen. Start with basic elements:
htmlCopyEdit<table>
  <tr>
    <td><strong>Jane Smith</strong><br>
        Marketing Consultant<br>
        <a href="https://janesmith.com">janesmith.com</a><br>
        <a href="mailto:jane@janesmith.com">jane@janesmith.com</a>
    </td>
  </tr>
</table>
This code block includes bold text, links, and line breaks in a clean structure. You can expand this with social icons, images, or brand colors using inline CSS (styles written directly in the HTML).
Use an Online Signature Generator (With Trusted Examples)
If you don’t want to code, use an online email signature builder. Tools like:
- Wisestamp
- HubSpot Email Signature Generator
- MySignature.io
These platforms let you enter your details, pick a layout, upload a logo, and generate the HTML code. Most offer free versions with basic features and paid options for advanced customization.
Customize a Pre-Built HTML Template
Many websites offer free HTML signature templates. You can download and modify these templates using a code editor or visual editor like Canva or Stripo. Look for templates that:
- Use responsive layouts
- Include image placeholders
- Feature inline CSS (instead of external stylesheets)
After customization, copy the final HTML code for Gmail installation.
How to Add an HTML Signature to Gmail (Step-by-Step)
- Open Gmail in your web browser.
- Click the gear icon (top right), then choose “See all settings.”
- Under the “General” tab, scroll down to the “Signature” section.
- Click “Create New”, name your signature (e.g., “Work Email”), and a text box will appear.
- Paste your HTML code directly into the box.
- To do this correctly:
a. Open your HTML signature in a browser window
b. Highlight and copy the rendered content (not just the raw code)
c. Paste it into the Gmail signature box using Ctrl+V or right-click > Paste
- To do this correctly:
- Assign the signature to new emails and replies (using the dropdown below the editor).
- Scroll to the bottom of the page and click “Save Changes.”
- Compose a new email to preview how your Gmail HTML signature appears.
Troubleshooting Gmail HTML Signature Issues
Sometimes your Gmail HTML signature might not render the way you expect. This could be due to several factors, including how you copied and pasted the signature, image sources, or unsupported styles. If your logo or images don’t appear, it’s likely they were not hosted properly. Gmail doesn’t store images you upload—it simply displays them from wherever they’re hosted. If your image is saved on your local computer, Gmail will not be able to display it for recipients. Make sure all images are uploaded to a reliable hosting service and referenced using full URLs.
Spacing issues are also common. You might notice large gaps between lines or misaligned sections. This usually happens when Gmail strips out certain CSS or when your HTML is not using inline styles. Gmail doesn’t support embedded or external stylesheets, so any formatting needs to be included directly in the HTML element. For example, instead of using a class to define padding, add the padding style inline, like style="padding:10px;".
If links aren’t working or if they’re missing clickable areas, double-check the formatting of your anchor tags. Gmail may not recognize links without the full “https://” or “mailto:” prefix. Always use full URLs to ensure they are detected and remain clickable. When in doubt, preview the signature in a composed email to test how it appears and functions.
When pasting your HTML code into Gmail’s signature box, don’t paste raw code directly. Instead, render the HTML in a browser, select the visual content, and paste that into the signature editor. This preserves formatting and ensures Gmail interprets the structure correctly.
If issues still persist, try pasting your content into a Google Doc or Word document first, and then copying it from there into Gmail. This can sometimes help preserve the formatting that gets lost in direct browser-to-Gmail pastes.
Gmail Signature Design Best Practices
When designing your Gmail HTML signature, keeping it responsive is essential. A responsive signature adapts to different screen sizes—desktop, tablet, or phone—without breaking layout or causing horizontal scrolling. Since most emails are now opened on mobile devices, test your signature to ensure it scales properly and looks good on smaller screens.
Use web-safe fonts like Arial, Verdana, Georgia, or Times New Roman. These fonts are supported across all email clients and operating systems, which ensures consistency. Avoid fancy or custom fonts, as Gmail may substitute them with a default, which could distort your intended design.
Apply all styles inline. Gmail doesn’t support <style> tags or linked stylesheets in the signature section, so styling must be written directly into the HTML tags. For example, if you want a line to appear bold and red, write <span style="color:red; font-weight:bold;">Text</span>.
Host your images externally and insert them using a full HTTPS URL. Don’t use image attachments or embed images in base64 format. Gmail may strip these out or turn them into attachments that disrupt the appearance of your signature. Instead, upload your images to a secure image hosting platform or your own server, and copy the image address from there.
Design your signature to be informative but not overwhelming. Include essential details such as your name, job title, company, contact information, and relevant links like your website or LinkedIn profile. Keep the layout clean and avoid using multiple columns unless you’ve tested them across devices.
Always include alt text for images in your signature. This ensures that users with images turned off or email clients that block image loading can still understand what the graphic was intended to show.
How to Test Your Signature on Different Devices
Once your HTML signature is installed, don’t assume it’s perfect. Email clients render HTML differently—what looks good in Gmail on Chrome might break in Apple Mail or Outlook. Testing helps you catch problems early.
Start by sending a test email to your own Gmail, Outlook, and Yahoo accounts. Check how the signature displays in desktop view and mobile view. Try viewing the message on iOS and Android devices to see if fonts, spacing, and images appear correctly.
If your layout is inconsistent across devices, the issue likely lies in the signature’s table structure or image scaling. Gmail prefers simple HTML tables for layout instead of divs. Keep table widths in percentage rather than fixed pixels when you want a mobile-friendly signature.
Outlook, in particular, is known for poor HTML rendering. If something breaks only in Outlook, try simplifying your structure, avoiding CSS shorthand, and relying on table-based formatting.
Double-check link functionality on each device. Click every link—website, email, phone, or social media—to make sure they open correctly and are tracked properly if you’re using UTM parameters.
For thorough testing, you can also use email testing tools like Litmus or Email on Acid. These platforms let you preview your signature across dozens of clients and devices without needing to send individual test emails.
Final Tips for Consistent Gmail Signature Branding
Your Gmail HTML signature should look great and perform reliably over time—not just today. That means keeping it updated and aligned with your brand’s evolving needs.
If you use multiple Gmail accounts—for example, a personal address and a work account—make sure you’ve set up your HTML signature on each one individually. Gmail signatures are account-specific, and changes to one will not sync to others.
Periodically review your signature. Did your job title change? Did your company update its logo or brand color? Does the website link still work? Taking a few minutes each quarter to verify and refresh your signature can keep your communication current and professional.
If you’re part of a team, create a signature template that everyone can use. This keeps branding uniform across departments. You can distribute the HTML code internally and provide step-by-step instructions so every team member’s emails match your brand’s tone and appearance.
If you use Gmail through Google Workspace, administrators can create and enforce signature policies using tools like third-party signature managers. These tools allow centralized control over formatting and updates—ideal for maintaining branding at scale.