Learn how to add a safe sender in Gmail to ensure important emails never go to spam. Our 2025 guide covers whitelisting contacts, domains, and filters.
Have you ever missed a critical email, a job offer, a client update, or a time-sensitive invoice, only to find it days later, buried deep within your spam folder? It is a uniquely frustrating experience that can have real-world consequences. You rely on your inbox to be a dependable channel for important communication, and when it fails, it can cause significant disruption.
Gmail’s spam filtering is incredibly powerful, and in 2025, it processes billions of messages daily with remarkable accuracy. Yet, this very strength can sometimes become a weakness. The system can be overly cautious, misidentifying a legitimate message as junk and hiding it from your view. As email volume increases and communication styles change, the chances of these “false positives” grow. The good news is that you have a simple and effective way to fight back by telling Gmail exactly who you trust. This is done by managing your safe senders.
Imagine the confidence that comes from knowing every important message will arrive in your inbox, every single time. By taking a few moments to define who is a safe sender, you take control of your email flow, transforming Gmail from a source of potential anxiety into a perfectly reliable tool for your personal and professional life.
This guide provides a complete, step-by-step process for mastering safe sender lists and filters in Gmail. You will learn how to ensure your most important communications are always prioritized, never lost, and delivered directly to you without fail.
What “Safe Sender” Means in Gmail and Why It Matters
In the context of Gmail, a “safe sender” is an email address or an entire domain that you have explicitly identified as trustworthy. When you designate a sender as safe, you are providing a strong, direct signal to Google’s algorithms that messages from this source are important to you and should not be routed to the spam folder. This action essentially gives these senders a pre-approved pass to your inbox.
The importance of this cannot be overstated. It directly improves the reliability of your email communications. For business users, this means never missing a client inquiry, a project update from a contractor, or an invoice from a vendor. For personal users, it ensures that messages from schools, doctors, or family members always get through. This process allows you to customize Gmail’s powerful filtering engine to your specific needs, making it smarter and more aligned with your personal and professional relationships. It moves beyond passive hope and into active management of your digital correspondence.
A Brief Look at How Gmail’s Spam Filters Work in 2025
To appreciate why your input is so crucial, it helps to understand what Gmail is doing behind the scenes. Gmail’s defense system is not a simple checklist; it is a complex machine learning model that is constantly evolving. It analyzes countless signals to determine if an incoming message is legitimate or junk.
These signals include the sender’s reputation, which is a score based on the history of emails sent from their domain and IP address. The system also heavily weighs user actions across the globe; if many people mark emails from a certain source as spam, its reputation suffers. The content of the email itself is scanned for suspicious links, attachments, and language patterns commonly used in phishing or junk mail. Finally, Gmail checks for technical email authentication standards like SPF and DKIM, which help verify that the sender is who they claim to be. Your manual actions—such as marking an email as “not spam” or creating a filter—are among the most powerful signals you can provide. You are directly training your personal instance of this global system to recognize what is uniquely important to you.
The Primary Method: Adding an Address to Your Google Contacts
Gmail’s most basic and user-friendly way to identify a safe sender is by adding their email address to your Google Contacts. This is a strong indicator to Google that you have a relationship with the sender and wish to receive their mail.
How to Add a Contact on a Desktop Computer
The process is straightforward and can be done directly from a message. First, open an email from the person you want to add. Next, move your mouse cursor over the sender’s name at the top of the email, but do not click it. A small pop-up card will appear showing their details. In this card, click the “Add to Contacts” icon, which looks like a person’s silhouette with a plus sign. That is all it takes. The sender is now saved to your Google Contacts.
[Screenshot of the Gmail interface with an arrow pointing to the sender’s name and the pop-up contact card]
How to Add a Contact on the Gmail Mobile App
You can achieve the same result on your phone or tablet. Start by opening an email from the sender within the Gmail app. Then, tap on the sender’s circular profile icon located to the left of their name. This action will open a new screen with options. Near the top right of this screen, you will see the “Add to Contacts” icon. Tap it to save the sender’s information to your contacts.
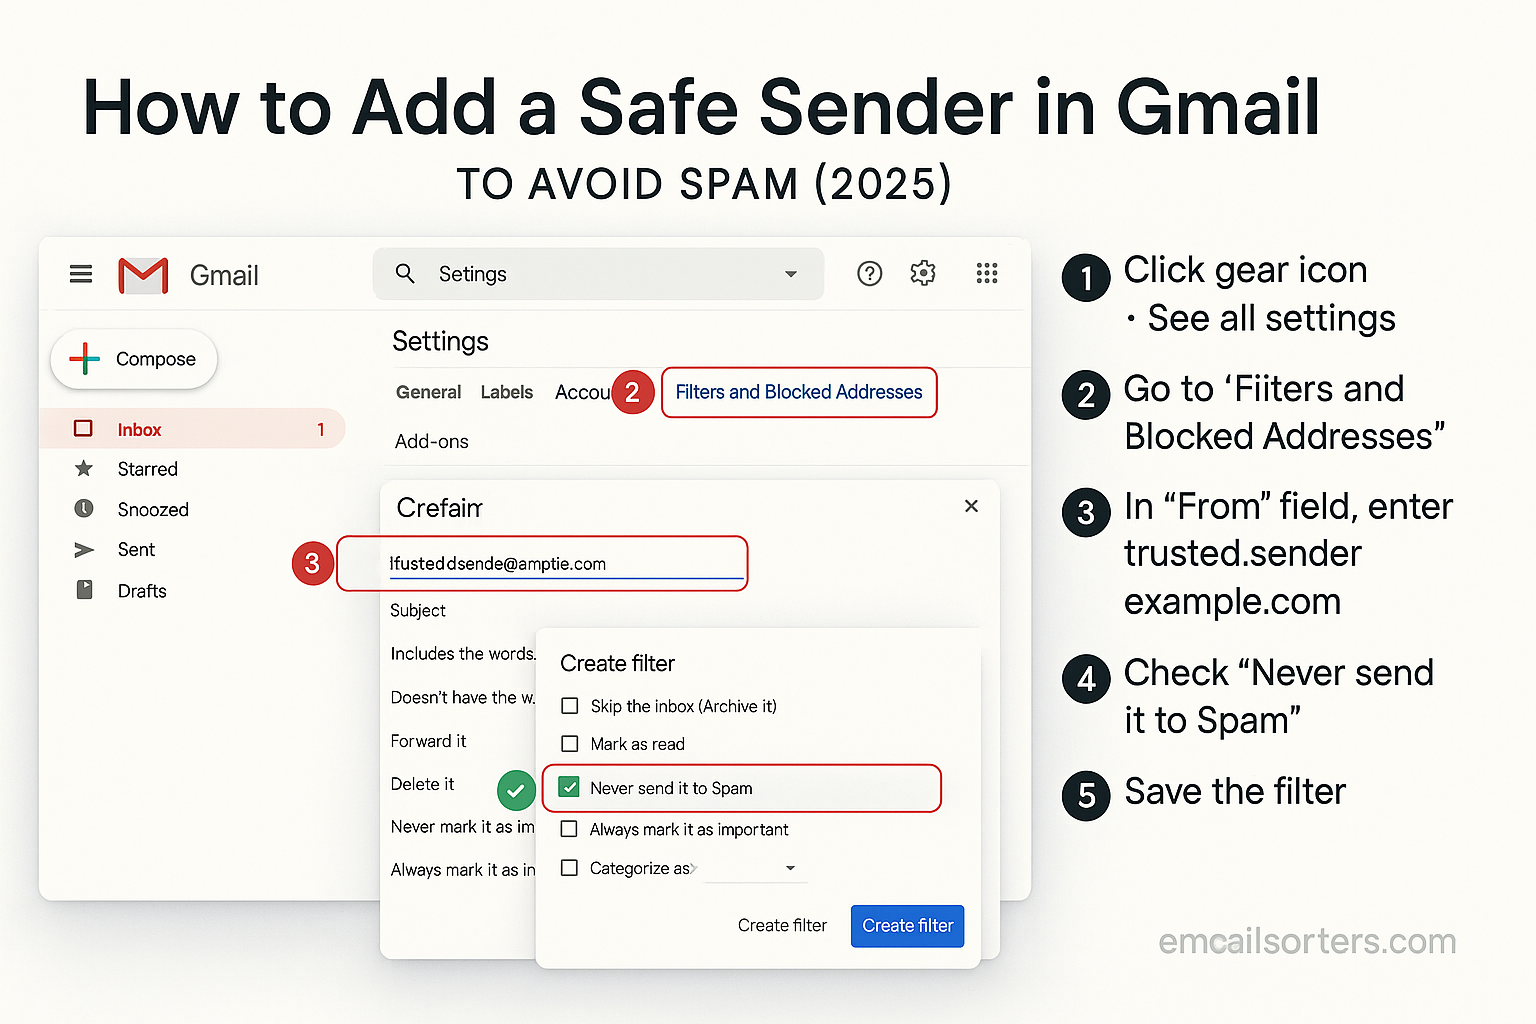
The Most Powerful Method: Creating a “Never Send to Spam” Filter
While adding a contact is effective, the most definitive way to guarantee an email reaches your inbox is by creating a specific filter. This method instructs Gmail with an unbreakable rule. This action must be performed on the desktop version of Gmail, as the filter creation menu is not available in the mobile app.
Here is the step-by-step process. First, sign in to your Gmail account on a desktop computer. Click the Settings gear icon in the top right corner and select “See all settings.” In the settings menu, navigate to the “Filters and Blocked Addresses” tab. From here, click the “Create a new filter” link.
A pop-up window will appear with several fields. In the “From” field, type the full email address of the sender you want to whitelist. Then, click the “Create filter” button at the bottom of this window.
[Screenshot of the Gmail filter creation window with an email address in the “From” field]
On the next screen, you will be presented with a list of actions. The most important one is “Never send it to Spam.” Check the box next to this option. For added organization, you could also choose to apply a label or star the message. If you want this rule to apply to existing emails from this sender already in your mailbox, check the box for “Also apply filter to matching conversations.” Finally, click the blue “Create filter” button to save your rule. This sender’s emails will now always bypass the spam folder.
How to Whitelist an Entire Domain in Gmail
Sometimes, you need to ensure you receive email from every person at a specific company or organization, such as @clientcompany.com or @university.edu. Instead of creating a separate filter for each person, you can whitelist the entire domain.
The process is nearly identical to creating a filter for a single address. You will navigate to Settings, then “Filters and Blocked Addresses,” and click “Create a new filter.” However, in the “From” field, instead of typing a full email address, you will type only the domain, preceded by the “@” symbol. For example, to whitelist all mail from Email Sorters, you would enter @emailsorters.com.
After entering the domain, click “Create filter” and, on the next screen, check the box for “Never send it to Spam.” This powerful rule will ensure that any email from any address at that domain will arrive in your inbox. Use this with care, as it means you will receive all communications from that domain, including marketing newsletters or other mass mailings.
Training the Filter: The Importance of “Mark as Not Spam”
Actively managing your Spam folder is another way to train Gmail. You should periodically check this folder to see if any legitimate emails were misidentified. If you find one, open the email. At the top of the message, you will see a banner with a button that says “Report not spam” or “Looks safe.” Clicking this button does two things: it immediately moves the email to your inbox, and it sends a powerful training signal to Google’s learning models that this type of message is not junk. This action helps improve the accuracy of the filter not just for you, but for all Gmail users.
Troubleshooting: When a Safe Sender Still Goes to Spam
On rare occasions, an email from a sender you have whitelisted might still end up in spam. This can be confusing, but there are usually logical reasons. The sender’s domain may have a severely damaged reputation, or the specific email they sent might contain content that is so similar to known spam or phishing schemes that it overrides your filter. A message with broken links or suspicious attachments is a common trigger.
Another possibility is that you have a conflicting filter or a setting in a third-party application connected to your Gmail that is mismanaging your mail. When this happens, first double-check your filter to ensure there are no typos in the email address or domain. If the filter is correct, the issue likely lies with the sender’s email itself.
A Proactive Approach to Inbox Management
Taking a few minutes to manage your safe senders is a proactive step that provides long-term peace of mind and inbox control. By telling Gmail who you trust, you ensure that you always receive the communications that are most important to you. This is a key part of maintaining a robust Gmail security posture, as it protects you from the information loss that occurs when legitimate mail is misplaced.
Of course, keeping important emails is only half the battle. For a broader approach to keeping your inbox clean from actual junk, a reliable spam fix can help manage the noise, letting you focus on the emails that matter. For further details on organizing your mail with rules, the official Google Help page on creating filters provides additional technical information. By actively managing who can reach your inbox, you transform your email from a source of potential stress into a reliable and efficient tool.